Friday 27 December 2013

Hedges - soft cover that looks good

When you have buildings in Europe you often also find hedges.  Hedges provide soft cover, obstacles for infantry and guns and make the table look better.  And they are easy to make.  Here is a step by step tutorial.
A place to hide
First you need some simple ingredients:
Lots of goodies
Green Scourers - the cheapest kind are best for this job.  Don't pinch your Mum's good ones, just go to a $2 shop and get the bulk packs that are useless for more than one pot.
3mm MDF for the base, cut to 1" x 6".  We have found this to be the best mix of price and durability.
Some dirt or sand from the back yard or garden or your brother's or children's sand pit.
The flock is Blended Turf Green Blend T49 from Woodland Scenics.  This is the most expensive bit but it goes a very long way.  It provide a good fluffy texture to the hedges.
PVA glue - we use litres of this for all our terrain.
Some handy bits of wood and clamps.
A hot glue gun.
A hobby knife.
Black spray paint - the cheapest one is fine as it is only an undercoat and will be completely covered up.
Some brown paint for the ground.  A sample pot from the hardware or paint shop is the best value.

Step 1: The basic hedge bit
Hot glue is hot.  Don't glue fingers.  It hurts.
Fold the standard size hedge in half and cut length wise.  Then fold again and glue together.

Step 2: Squash it together.

Not too flat or it looks silly. About 6 to 8mm (1/4" or so) is about right.
Place the folded hedge in  between the wood and clamp so it keeps its shape.  Dn't squash too tight. One of our early attempts was squashed a bit too enthusiastically and it looked like it had been run over by a steam roller.  It only takes a few minutes for the hot glue to cool down.

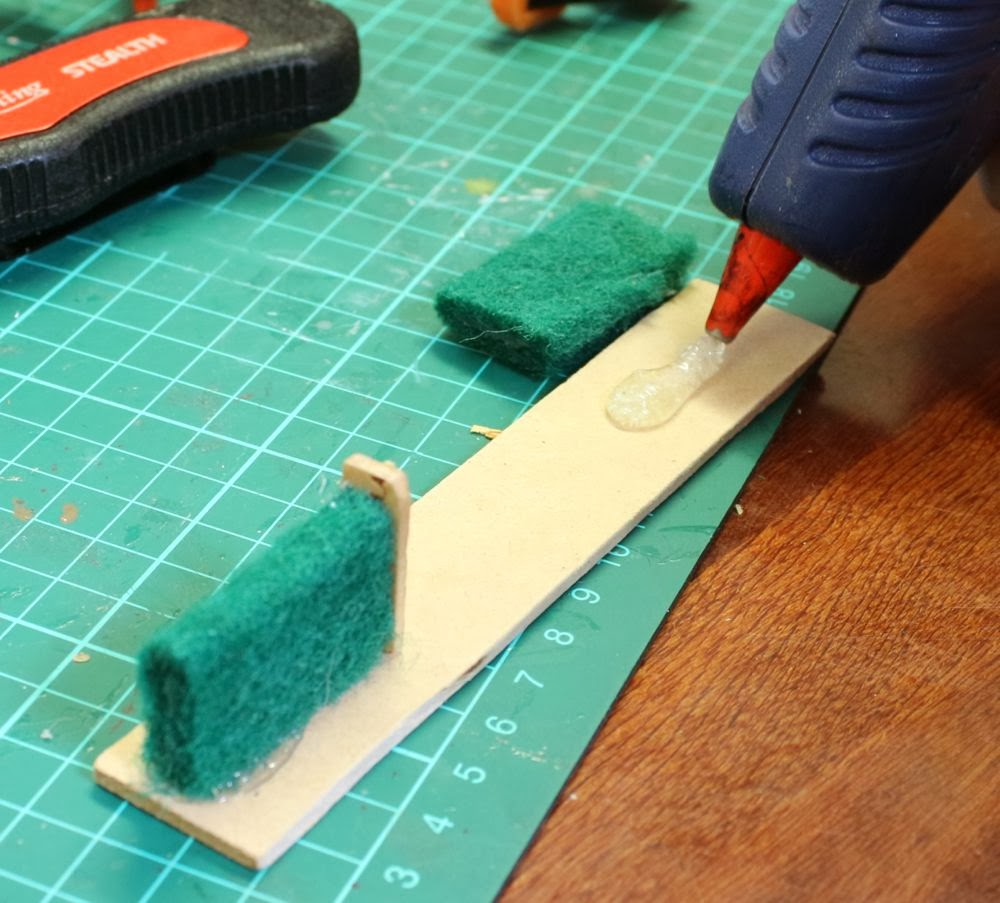
Step 3: Glue to the base
Plenty of glue is fine.  It will all get covered up. 
Make a gap and attach a suitably trimmed icy pole stick as fence posts.
The hot glue makes sticking the hedges to the base very easy.  It doesn't matter if you use too much glue as it will just look like the dirt base of the hedge once you are done.  Once more, remember hot glue is hot.

Step 4: Apply dirt and sand.
Apply the PVA glue.
Roll in the sand 
Ta da!  Basic underneath stage done.
Paint the PVA glue liberally on the base and dunk into a container into which you have placed your sand and dirt mix.  It doesn't matter if some goes on to the hedge bit as it all looks fine in the end.

Step 5: Undercoat with Black spray paint
Spray the lot black.
An inexpensive matt black spray paint is good for liberal coverage of the hedge and base.  You could also use a dark brown paint but this tends to be more expensive than the common matt black spray, and as it will all be covered anyway, why spend the extra?

Step 6: Paint the dirt
Dark brown first.
Dry brush light brown
It may look as if we are using expensive wargaming paint, but we are just reusing the pots refilled with sampler pot paints.  Once more, it doesn't mater if the paint goes onto the hedge as this can represent dirt or branches.

Step 7: Apply the green bits
Apply the good old PVA glue
Dunk into the flock placed in a container
Shake off the excess 
Glue any missing bits and dunk it again.
Liberally paint the hedge with PVA glue and dunk into a container you have filled with the flock.  Then tap off the excess.  There is no point wasting any of this as what doesn't stick now will only fall off later on the tabletop. You are bound to have missed patches so just apply a bit more PVA glue and dunk again.

Step 8: Admire your handiwork
Hans! Shoot the Britisher Cromwell!

Saturday 14 December 2013

Padawan Training

Pulling Order Dice is a very important job.
Any practice that wants to survive long term has to have a generational plan.  Newcomers need to be introduced and then trained and eventually introduce and train others.
Wargaming is no different.
Luckily there are so many levels and facets to the hobby, new recruits can start at almost any level.
The youngest get to wear the cool hats, learn appropriate gun noises and be part of games by pulling order dice from the bag or rolling dice with another player.
As their comprehension and tactical skills improve they can take greater parts in games.
As their dexterity and patience improves, they can build and model scenery, figures and vehicles.

I have had the pleasure this week of realising that my son now paints better than I do.
We're setting up over there. Schnell!
Here is a German MMG unit relocating their weapon which he built and painted.  We recently purchased some good paintbrushes and better equipment and his level of skill has been enhanced greatly.

Not only that, now that school holidays have begun, he has taken an eye to my figures and decided to "upgrade" them.
Now my figures are pretty reasonable and certainly table top worthy. But I grudgingly agreed he could "touch them up" if he wanted to.
Well, they are now upgraded.
And as we all know, better painted troops always fight better.
He has been involved in Wargaming at various levels since he was 8 years old, but this has increased a lot this year.  Now at 15 he plays, paints and builds models and scenery as well as anyone else.  My padawan has advanced a level!
We are upgraded.  Beware!

Pegasus Bridge replayed - don't rely on first impressions!

Cancon is looming (January 26) and we continue to play test and prepare our games.  We will be having an extended Pegasus Bridge game with 3 gliders and 75 British tough guys vs 50 Germans plus lots of reinforcements over a double board to be played as 2 x 6 turn games, the second following directly after the first using survivors plus German reinforcements.  It should be fun.  
Here are two views of the double board (6 ft x 8 ft):
The full 6 x 8 board
Both sides of Pegasus Bridge
When we first played the official scenario that came with the Pegasus Bridge set we were sure it was unbalanced and the Germans were way outmatched by the Veteran Tough Fighter British. "Warlord games mustn't have play tested this much," we thought.
It is often easy to judge the strength or weakness of units or scenarios from one's armchair or around the table or bar. But Bolt Action is a fascinating game system whereby what seems overpowered or underpowered has hidden strengths and weaknesses only revealed through the pain and suffering of hard experience.
In our first game last week, the British romped it home and had a solid draw at the end because the Germans retained a few guys on the bridge.
Today was completely different.  We played the official scenario twice.  It only takes about 75 to 90 minutes.  One of our friends who is new to the game played British and we were stunned that every man of his was wiped out.
A failed British frontal assault.
The Germans are inexperienced and shirkers which meant they had to roll morale EVERY turn to do anything and needed to get an 8 or less to perform orders.  Any pins were doubled. And every shooting roll had an additional -1.  And they needed a 5 or 6 to kill a British soldier if they did score a hit.
"Doomed!" we thought, "Way underpowered."
But numbers did make a difference.  There were not many British figures and they had to brave the open to get to the bridge. In this photo, a British squad attacked a German squad clambering up the bridge stairs.  The Germans could shoot reaction fire and killed 2 of the British guys. The last one killed one of the Germans and the surviving troops killed him.
Major Howard showing the way.
Like last game, Major Howard stayed in the Glider until turn 5!  When he finally emerged, only one other part squad remained so he charged directly onto the bridge and assaulted a German unit.  With just 2 men they defeated the German unit. Easy.  Like how we figured it would normally happen.
Then the remaining German units finished him and his other guys off and won the game.
"Ha!" I said, "It must have been the inexperience of the commander, let me play."

Once more Major Howard remained in the glider until turn 5.  There is a 1 in 3 chance a unit remains in the glider each turn.  So over 3 games, Major Howard has remained in the glider for 12 turns.  A 1 in 3 chance to the power of 12 or 1 in 531,441 chance.  Or stupid numbers, but it happens!
Come closer and I'll bite your leg off.

By turn 5, when Major Howard decided to do his job, only one other British soldier remained alive.  Only 3 Germans had been killed.
He raced up to the barbed wire, then in turn 6 raced onto the bridge, close assaulting a German and throwing him in the river.  There were Germans in the control box meaning the bridge was contested so it was a draw!  But wait - there was a turn 7!
The British Order dice was drawn first (a 1 in 7 chance) so he ran 12 inches further along the bridge hiding behind the bridge wall for safety.
Then every German unit either failed morale or was too far away to see or shoot him.
Phew.  Still a draw.

So, my apologies to Warlord Games.  The scenario is balanced. It serves me right for smugly believing one game was enough to judge a unit or scenario's balance and effectiveness.

What did we learn?
Shirkers are painful, but when in defence and with enough of them they can do reasonably well.
Veterans and tough fighters are great but they aren't invincible.
Once more Bolt Action provides a fun and memorable game.
PS. Is Major Howard really jinxed to stay in the glider?

Wednesday 11 December 2013

Cancon Prep - The Hats

Officer and assistant
As part of our public participation game at Cancon we wanted to make it memorable for any young lads that wanted to play.  Part of that is getting into the spirit of the thing.  Nothing says that better than an appropriate hat while fighting on the tabletop.
So we tracked down some hats and they arrived in the mail today.
All the boys immediately road tested them.
We have a Royal Horse Guard cap and two British "soup bowl" helmets.
The other hat we have for use is a Russian Fur Hat which we name "Ike".  That is a name of an old Black Scotty dog we used to know who looked just like the hat.
Four boys ready to play!

Thursday 5 December 2013

Pegasus Bridge - The Official Scenario 1

Today we did a practice game of the first official scenario that came with the Pegasus Bridge set. It was a very enjoyable game that took about 90 minutes to complete as there were only limited units in play.

British Light Infantry - (All Veteran and Tough Fighters - 2 close combat attack dice each):
Major Howard (+4 morale) and trooper
3 squads of 3 men
2 man PIAT team
5 Command Dice

Germans (All inexperienced and shirkers - Roll for morale every turn, double pins, -1 to fire)
3 squads of NCO + 3 riflemen
1 squad of NCO + 4 rifleman
2nd Lieutenant (+1 morale) + 2 riflemen
MG42 MMG team
Medium AT gun in entrenchment
7 Command Dice

So a very small game, 5 dice vs 7 dice with a simple objective: Control the bridge by having at least one of your men and none of the enemy on the bridge.  Anything else is a draw.
Even though the Horsa is not finished we had enough to give the idea.  To get out of the Horsa each unit had to roll.  1-4 means they can run or advance, a 5 or 6 means they stay in the Horsa and try again next turn.
The Horsa will see better days ...
Turn 1
All the British successfully left the glider - EXCEPT for Major Howard.
The German MMG was killed in one shot (6 to hit, 6 to kill and 6 for exceptional damage) and a British unit had one pin.  The Germans rushed two units onto the bridge. The AT gun turned around so if the Germans had first dice they could fire.
Go Boys.  I'll come when I get this helmet off.
Turn 2
Major Howard stayed in the glider. In the real Pegasus Bridge battle the Major's helmet slid down over his eyes during the landing and he was afraid he had lost his sight. We thought this was an amusing co-incidence in this game.
The gun wanted to fire but failed the order morale.
Everybody mooove!
The unit on the German right flank kept shooting and despite needing 6s and up, achieved more hits on one of the British squads.  Meanwhile, the PIAT team fired at the AT Gun.  Boom! Fire, explosion, failed morale, gun out of the picture.
Cheerio boys.  I'm right behind you.
Turn 3
The German plan of slowing down the British was working.  The barbed wire and tempting targets distracted the British.
Climb before they shoot you!
One of the German squads raced up the stairs.  The aim was to have at least one man on the bridge to make a draw.
Turn 4
Major Howard was still fiddling about in the glider while his men got on with the job at hand.
Gentlemen, I'll be right there.  I will.
Fire is raining onto the British from all sides but all to no effect.  An occasional pin but nothing more.
Finally a British unit runs close to the German unit on the bridge, firing with little result.  And the Germans charged the veterans in Close Assault!
Get off our bridge Tommy!
Two 6s left only one British fellow alive who failed to kill any of the Germans - even when he only required a 3+. The Germans quickly regrouped back to where they had been hiding behind the wall.
Turn 5
The British finally realised they had been dawdling too long. Major Howard finally decided to join the party and raced out to get his men moving.
This is our bridge now, boyo!
Another British squad close assaulted the German unit wiping them out in one go. But there was only one turn left - or maybe two.
Turn 6
Upstairs we go, down you go!
Another assault up the stairs promptly dispatched the Germans lurking above, but it was too late.  The German HQ squad was defending the bridge control room and there was not to be a turn seven.

The game was really enjoyable, plenty of Command Comic Moments, a British FUBAR, and plenty of excitement.
For Cancon we will also work on a larger scale version of the game with more troops on both sides and a larger board encompassing both sides of the Bridge.

As always we learned more things about the game:

  • Shirkers and Inexperienced are pretty hopeless can are cheap and can do their job.
  • Small units have different dynamics to the fuller units we normally use.
  • Veterans are hard to kill.
  • Tough fighters should love close combat!


Pegasus Bridge - The Official Scenario 1

Today we did a practice game of the first official scenario that came with the Pegasus Bridge set. It was a very enjoyable game that took about 90 minutes to complete as there were only limited units in play.

British Light Infantry - (All Veteran and Tough Fighters - 2 close combat attack dice each):
Major Howard (+4 morale) and trooper
3 squads of 3 men
2 man PIAT team
6 Command Dice

Germans (All inexperienced and shirkers - Roll for morale every turn, double pins, -1 to fire)
3 squads of NCO + 3 riflemen
1 squad of NCO + 4 rifleman
2nd Lieutenant (+1 morale) + 2 riflemen
MG42 MMG team
Medium AT gun in entrenchment
7 Command Dice

So a very small game, 6 dice vs 7 dice with a simple objective: Control the bridge by having at least one of your men and none of the enemy on the bridge.  Anything else is a draw.
Even though the Horsa is not finished we had enough to give the idea.  To get out of the Horsa each unit had to roll.  1-4 means they can run or advance, a 5 or 6 means they stay in the Horsa and try again next turn.
The Horsa will see better days ...
Turn 1
All the British successfully left the glider - EXCEPT for Major Howard.
The German MMG was killed in one shot (6 to hit, 6 to kill and 6 for exceptional damage) and a British unit had one pin.  The Germans rushed two units onto the bridge. The AT gun turned around so if the Germans had first dice they could fire.
Go Boys.  I'll come when I get this helmet off.
Turn 2
Major Howard stayed in the glider. In the real Pegasus Bridge battle the Major's helmet slid down over his eyes during the landing and he was afraid he had lost his sight. We thought this was an amusing co-incidence in this game.
The gun wanted to fire but failed the order morale.
Everybody mooove!
The unit on the German right flank kept shooting and despite needing 6s and up, achieved more hits on one of the British squads.  Meanwhile, the PIAT team fired at the AT Gun.  Boom! Fire, explosion, failed morale, gun out of the picture.
Cheerio boys.  I'm right behind you.
Turn 3
The German plan of slowing down the British was working.  The barbed wire and tempting targets distracted the British.
Climb before they shoot you!
One of the German squads raced up the stairs.  The aim was to have at least one man on the bridge to make a draw.
Turn 4
Major Howard was still fiddling about in the glider while his men got on with the job at hand.
Gentlemen, I'll be right there.  I will.
Fire is raining onto the British from all sides but all to no effect.  An occasional pin but nothing more.
Finally a British unit runs close to the German unit on the bridge, firing with little result.  And the Germans charged the veterans in Close Assault!
Get off our bridge Tommy!
Two 6s left only one British fellow alive who failed to kill any of the Germans - even when he only required a 3+. The Germans quickly regrouped back to where they had been hiding behind the wall.
Turn 5
The British finally realised they had been dawdling too long. Major Howard finally decided to join the party and raced out to get his men moving.
This is our bridge now, boyo!
Another British squad close assaulted the German unit wiping them out in one go. But there was only one turn left - or maybe two.
Turn 6
Upstairs we go, down you go!
Another assault up the stairs promptly dispatched the Germans lurking above, but it was too late.  The German HQ squad was defending the bridge control room and there was not to be a turn seven.

The game was really enjoyable, plenty of Command Comic Moments, a British FUBAR, and plenty of excitement.
For Cancon we will also work on a larger scale version of the game with more troops on both sides and a larger board encompassing both sides of the Bridge.

As always we learned more things about the game:

  • Shirkers and Inexperienced are pretty hopeless can are cheap and can do their job.
  • Small units have different dynamics to the fuller units we normally use.
  • Veterans are hard to kill.
  • Tough fighters should love close combat!


Monday 2 December 2013

Pegasus Bridge - The Pond


A pond - with extras
In the battle for Pegasus Bridge the preliminary observations missed the vital placement of a pond near the bridge.  As the gliders came flying in to land the pilots had to quickly react to this body of water which could have killed everyone.  Luckily all 3 Horsa gliders missed the bridge (one by a whisker), so we had to create a pond for our board.
Paddle faster!

But a pond on its own is pretty boring.  So we added a couple of items for interest.
Starting with the MDF board cut into a vaguely pond shaped piece, we created a ridge and texturing with the cheap modelling clay we are using for almost everything.
Then we glued this to the MDF. When dry, we painted the pond with PVA glue to make sure the whole thing was non porous as we would be using "Realistic Water", a product from Woodland Scenics. Check out the video on top of this page to see how it can be used.

Stupid briefcase.  It should have been labelled "Lunch".
Then we sprayed a black undercoat, adding a mix of dark green through to light brown at the edges to give an impression of depth.

We then painted a shape of a shark looming in the middle of the pond.  The reeds are made from an old dustpan brush, glued onto the base with PVA glue, bending some over for where I was going place our unfortunate fellow.

Once dry, we poured on the Realistic Water.  The dead Intelligence officer was placed face down into the water, clutching his poorly named "Top Secret" briefcase.  After 24 hours or so, I placed the duck in the water and cut a hole in which to place the fin made from cardboard painted black.
Then I poured on another layer of realistic water as it tends to shrink.
Once all that was dry we added more reeds, the escaping duck's mate yelling encouragement and some grass on the side.

It all turned out pretty well.

Sunday 1 December 2013

Bolt Action Grand Tournament - A pictorial review

We visited the Bolt Action Grand Tournament at The Hall of Heroes gaming mecca in Campbelltown today.  It was day two of the tournament and we went there as visitors to meet other players, learn new techniques and tactics for gaming and scenery and perhaps pick up some supplies.
This post covers a lot of the day with photos and some commentary.  Overall we had a great day.  The players were very friendly and accommodating and glad to assist people like us wanting to learn more.  The standard of scenery and armies was very high.  Generally the games all told different stories with thrills of victory and agonies of defeat in the same game - and many time to the same player!
A fantastic town board - but hard to fight in.
Many of the boards were built up boards like the one above.  Sculpted hills, roads, rivers and more provided plenty of scope for tactics and strategy and situations many boards cannot offer.  The following photos were on this board:
Hold until relieved - even when pinned.
 This unit of commandoes was defender in a "Hold Until Relieved" scenario.  After being pinned to immobility, it still held the objective. But the nature of the board meant the attackers had to come from the front which held risks of its own.
The buildings had lovely little gaps between them just asking for infantry to sneak around.
Just come closer little American tank...
The last turn charge!
The multi level nature of the board allowed for shots down stairs, troops hiding along streets, attacks from houses and gaps.
Marine Sniper heaven in a city board

Bazooka shot down the stairs.  Missed!
In a moment, we charge!
Other than the boards and their effects, the painting quality of the troops was very high.  Here are a collection of some of the great painting on display.  Remember - painted troops fight better.
Australian 25 Pdr
 These Australians were brought in by a fellow who couldn't play in the tournament, but everyone had a good "ooh" and "aah" over this lovely painting.
Australian squad charging into action
Clint Eastwood staring my camera down.
 Some players increased interest by having excellent characters in their armies.  In the same army as Clint Eastwood were characters from Kelly's heroes.

Hold until relieved - very outnumbered

Defending the hay bales
British Commandoes flaming out the defenders.
A quick drive and firing of my machine gun can get one out of difficulty
 
When side stepping is safer than standing firm against a King Tiger!
British Commando sniper team
 
German Mortar team - check out the eyes and detail
An Australian Squad moving into action
 
A German unit carefully advancing down a gully.
Overall this was a great event.  Congratulations to the organisers and to the players.

LinkedWithin

You may also find these posts of interest: