Showing posts with label Buildings. Show all posts

Sunday, 8 June 2025

After Action Report - Kings Border Clash 2025

It was a dark and wintry Friday night in Albury when we set up the hall ready for the inaugural 2025 Kings Birthday Border Clash tournament. As we had plenty of space and folding tables, we were able to provide a very civilised gaming setup with space and an empty table between the gaming boards. This allowed players to properly set up their gear on the central tables and have space to store their troops on the edge of the boards.

The DemoGamers were able to provide the 6 gaming boards plus a very detailed demonstration board. We need to do some more scenery days to expand our roads, hedges, trees and more to properly fill the boards!

The tournament attracted 12 players, of which 7 were new - that is, they had played less than 5 games before this event. We are not counting just competition games, but any games at all. Our seasoned players enjoyed the varied tables and opponents who improved each round of play. The first round had more basic questions, but by the third round every player was having more challenges as all the new players had mastered the basics and were trying new strategies and tactics. The best part of new players is that they don't know certain moves aren't normally done. So when they are tried in the game, all participants learn why they aren't normally done, or discover some interesting new options to try next time!

Here are our volunteers and the layout after finishing set up around 9pm on Friday evening.
We always try to ensure our historical boards tell a story. It's always more interesting fighting over "The Manor" or "The Factory" or "The fishing Village" than just a random collection of terrain pieces.

We also setup the Outer Cherbourg board. This will be enhanced, ready for Victorious Tabletop Game Show in August.
As part of the Tournament, we not only supplied the 6 boards, but also 3 tournament armies, 4 demo armies and the spare dice and tapes as required. We want to ensure that all the new players get to enjoy their day with all the right gear.

Here are a couple of highlights of the day. This photo shows the successful advance of a German squad with a panzerfaust, close to the very heavy Churchill tank. Boom! A well spent 15 points for the panzerfaust.
We were relaxed about painted armies as we knew we had so many brand new players. Everyone understood that grey "ghost" armies are OK, just so we can bring new players in. Even so, we had many well painted armies which really worked well with the detailed boards.

Sometimes, the dice gods are not on your side. As players quote "Bolt Action Happens" when the vagaries of the dice rolls dismantle their best laid plans.
Here the squad went to pass an order test with only one pin. 12. FUBAR! They then rolled friendly fire and shot at the officer team right next to them. All hit, but no wounds. Phew!
Another sad tale was the Flak 88mm attempting to pass an order test and getting a 12, then run off the table. Boom. A very expensive order dice abandoned in the field. At least the player with most FUBARs won a prize and choice from the prize table.

The sponsorship for the day was exceptional. Plenty of choice for certificate winners and after they all had a go, there was enough for all participants to have a pick. No one left without prizes worth more than their entry fee.

Thank you to our excellent sponsors:

We have been asked to show the boards we used in the tournament so here they are:

The Bocage Board - Normandy

Lots of bocage which counts as hard cover, and a lot of it is sight blocking terrain for infantry.
Deceptively open in patches, then blocked in others.


The Chateau - France

Bordering fields and a manicured garden. More open areas, with hard and soft cover walls, plus rough grounds for the wheat fields.

Jungle Pipe Factory

Railway line through bamboo jungle and paddy fields.
A lovely mix of hard and soft cover, lanes of fire and hiding places and buildings to fight over.

The City that shall be named

We have collected lots of lovely buildings over the years and wanted to see how a game worked with lots of buildings in Bolt Action v3. It worked well, despite all the fears from the changes to buildings made in v2 and carried through to v3. Yes, being in a building when facing a tank or gun is sad, but you can move through buildings and the tank can't catch you! And you can pop up behind a tank really easily. Viva la Panzerfaust and Bazooka!
Time for more roads!


Our Lady of the Snow - Winter Church board

A very large church dominates the board with fields, hedges and walls and a smaller house with orchard.


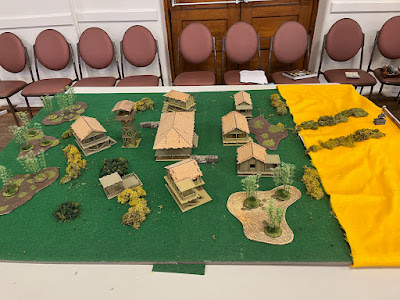
Jungle Fishing Village

We purchased the Sarissa Precision Far East village buildings a long time ago, built and undercoated them and stored them for later use. The board worked surprisingly well.
A randomly laid out series of wooden buildings around the main gathering shack in the centre, surrounded by vision blocking bamboo thickets.
The village borders a beach with a statue facing the sea on a cliff. Very yellow sand! (We'll have to fix that)

Sunday, 27 August 2017

Now That is What I Call a Railway Station

We have just completed a marvellous MDF building kit from Things from the Basement "20th Century Railway Station".
This is a wargamer's building - tough, transportable, multi level with stairs and lots of places to place your models. It comes as unpainted laser cut MDF with instructions you can download from their web site.
45 inches - Infantry take four turns to traverse this station
This is definitely an advanced kit, part of the "Master Builder Series". It is not too difficult, but there is a lot to do. One suggestion I have already made to the very helpful guys from Things From The Basement is to number the pieces and match the part numbers to the instructions.
We started on the left hand tower and once we mastered that the concepts all flowed through to the rest of the building.
I'm about to start my game long charge!

I can see you but you're out of range.
This is actually five buildings in one. The left and right towers, the two connecting halls and then the main hall.
For this building we decided to approach it different to our normal impatient method. Rather than just building then try painting it afterwards, we did most of the painting and other effects before we glued it all together.
Instead of painting the floors I made some "tiles" by using Pages and creating a multi coloured grid of main tiles, with the alternate darker tiles having a train wheel in the centre.
Then we made some smaller light and dark green "tiles" for the edges and some black and white squares for the entrances, stair landings and ticket booths.
Just add trains.

Multi Level with stairs, hand rails and balcony
We thought a logo would look grand so I found a stylistic rose, duplicated and mirrored it and added the initials "TDG" - The Demo Gamers.
The effect worked.
We used a variety of colours from sample paint pots you can obtain from the paint or hardware stores. These are inexpensive and can be whatever colour you request.
The hardest decision was what colour to paint the train station. This led to a search on the Internet for train stations.
By accident we stumbled across the Dunedin train station in New Zealand. Click the link. It's an amazing station. Now we had the concept and just had to put it in place.
Lots of windows and doors to fire from.

The Main Hall with ticket booths, telephone booth and clock.
Initially we were just going to paint the stone parts a dark grey, but my son said we should make it look more like stone. So back to computer I went. I found a sample stone picture, duplicated and meshed it all together so I had a full page of stonework.
Then we painted all the interior walls a beige colour and applied the stonework to the outside. The floors were all prepared with our tile-work, painted with a satin varnish to both make it look better, but more importantly, protect it from dust and marks.
Then the walls went up and already we had a great start.
My wife and daughters helped in painting all the white facings and trim and the red roofs.
As each part was completed we put it all together. Although there was a delay in getting the building constructed as we had to paint the parts first, the result was a much cleaner production. The white trim could be painted without worrying about marking adjoining walls and the results are really crisp. It also meant that younger hands and older eyes could easily paint the parts.
As you can see there are A LOT of windows and trim!
The final stage were the main hall ticket booths, telephone box and signs.
The telephone booth had to be blue of course and the ticket booths were green as that is the sample pot colour we had at hand. Once more it was all painted and prepared before we glued each part in place. Then we just touched up the edges. The door handles and clock hands are separate pieces which meant we could paint them gold/brass and glue them in place making it all very neat.
I didn't bother using the laser cut writing on the signs as I would never be able to get this straight or neat enough. So back to the computer to create the lettering.
I also found a clock face with no hands and roman numerals which I scaled appropriately and glued in place.
After each of the signs and clock were in place we also varnished them for safety and then glued in place.
The longest search was for a suitable looking train timetable. I found one which we used but even scaled down to 28mm scale it is still readable (with good eyes or my favourite tool, a photo and then zoom on the screen). It's a pity the French train station has trains departing for Salisbury, but I suspect all trains are delayed by the war.
Overall this is a great model and am very glad that the early draft version had been used in game and shared on the Bolt Action Facebook page. This led me to track down the production model, make a very reasonable deal with the guys to send it all the way to Australia and then plan our construction.
I think your train may be late.
This Railway Station will be taking a key role in the upcoming public participation games we will be running over the rest of this year. Stay tuned for more details.
We will also be updating our Bolt Action building considerations. This is definitely not a standard size building in normal game terms!
(Note these building considerations will be updated to take into account the fine changes to buildings in Bolt Action v2 very shortly)

Sunday, 8 March 2015

Building Wooden Foot Bridges

The cheap Ingredients

While preparing our Attack on the Lorient Dockyards 1942 board, we needed some bridges to get from the walls to the submarine. Like most terrain we build, we want it to be useful for multiple boards and scenarios. And we wanted it to easy to make and inexpensive, yet look good.
So we started with the basic ingredients:
  • Pop Rivets 35mm long.
  • Icy Pole sticks/Coffee stirrers
  • Cheap wool
  • Super Glue
  • PVA Glue
Using the clippers trim the rounded edges of the wooden sticks.
Completed but unpainted
Then using some shorter pieces as supports make your bridge. You can be rough or neat depending on the look you want. At this point all you are using is the wooden stocks and PVA glue.
Now we want our rails. Drill holes near the edge and at roughly 1 inch intervals. Then poke the pop rivets in so they stick through about 1 cm or half an inch. Use superglue to keep them in position.
Once dry use the wool to create the rope railing, wrapping it around each pop rivet, move it down over the edge and then around the base of each pop rivet. This is to give the bridge lots of strength, and it looks good too.
Then paint the wool with PVA glue.  This strengthens the wool, sticks down the fibres and makes it all very strong.
Lastly, you need to trim down the pop rivets at the end of the bridge.  Either use tough pliers or grind them down - or get some shorter pop rivets for the end poles!
Painted and beautiful
This step is important to allow the bridge to rest on the edge of whatever you are placing it against.  The longer poles in the middle keep it stable.
Then paint it brown with black wash and finally paint it with some satin varnish (we buys ours in a 500ml tin from the paint store).
It turns out pretty well and will work for any setting from modern to ancient where the construction would have been done using basic wood and rope materials.
This isn't going to end well...
Lastly, you can see how we have used it in our dockyards game. We have placed a bridge from each of the Heights Project bridge ends. They make it perfectly across to the sub to provide for a great cinematic charge or two.

Lastly we had a bit of fun with our Gandalf figure and the phrase so many keep repeating, "None Shall Pass".
We couldn't avoid the pun.

This is what bridges are for.

Sunday, 1 March 2015

The French Dockyards Part 2 - The sub is built

It takes two to hold the hull together.
Plain Grey Plastic is boring
We have been busy this week building our submarine as the centre piece of our French Dockyards 1944 board. In our heads we thought we could imagine 42 inches of submarine goodness, but it was still quite large in reality.
Being a quality plastic model there are LOTS of tiny little details and pieces everywhere. Even though we won't be using most of them they certainly add to the style of the boat. The difficulty level of a Revell model goes from 1 (easy) to 5 (advanced).  This definitely earned the 5 rating.  The first step was to drill lots of holes in the hull to which the side rails would eventually be attached. This is nothing like the resin tank models with 3 to 10 parts.
This was over 160 parts from little foot rails around 5 mm across to the massive hull sections.
The end result was a success.  Just placing it on the board encouraged us to start placing figures in various battle positions on and around the boat.
Now this boat is 1/72nd scale.  The reason we can get away with this is that it is part of the scenery, but troops will not be going in it.  They may hide around the superstructure, or we will have special rules so they can race to use the 2 twin 20mm or 37mm AA guns on the deck, but in general it is great "eye candy".
Hmmm. Perhaps not.
Now that it is built we had to face the prospect of doing it justice by painting it properly.  Our first idea was to use a grey spray paint and touch it up, but a fellow gamer who is a much better painter than us asked if we wanted to use an Air brush.  "We'd love to," we replied, "But haven't yet advanced to that level."
She then most generously offered to paint it for us with her excellent air brush and superior painting skills.  We'll trade with a specially organised demo game at her place. Wait till you see this next week!
Looking at the plain grey submarine, my family thought that we should consider using the historical documentary "Operation Petticoat" as a guide and paint it pink.  I did a mock up with Photoshop. Perhaps not.

Sunday, 22 February 2015

The French Dockyards 1944 - Preview

We are planning our next Boot Camp for Hawkcon on the 9 and 10 May. While pondering over the main board we saw another gamer had an interesting board with a U Boat or something similar as a centre piece. That got us thinking, so we searched for an appropriate boat.  Our first discovery? Boats are big.  Actually HUGE would be a better description. Getting most boats to scale would be larger than our standard Bolt Action 6' x 4' board. However, we were able to successfully use 1/72 scale gliders in our Pegasus Bridge game so we thought that would work here.
A little small but it'll do.

We discovered this Revell German Submarine Type IX C 1/72 Model Kit online and were enthused at our options.
At 1063mm long (42") this meant we would have to carefully work out the best way to place this on the board to get the most benefit.
Combining this with our city heights project (the planning and the result) was our solution, as you can see by the video above and the photos here.

Now we have a little work to do.
Add Boat Here
Firstly we need to add a couple of corner height sections, some beach areas and paint the foam.
Then we need a gantry to go across the boat and some walkways from the boat to the sides.
Lastly - or  firstly once the kit arrives this week - will be building and painting the whole point of this board - the submarine!

What else is there?
We then have the fun mission of working on the armies we will be using.

Naturally it will be 600 point forces, but we are considering a mix of Kreigsmarine and boat crew for the Germans and perhaps Americans, British or Commandos for the Allies.
We are considering setting this as a battle just after the Sword Beach landings in June 1944.
We'll see what response we get and how play testing goes.

More next week as we progress.

Our public playtest of this game will be at The Combat Company on Saturday 21 March.  We will also be having a second board on which we will be running our Boot Camp.

Let us know if you will be coming along.

Thursday, 29 January 2015

Our Building Clarifications

Now that's a city fight
Over the last few years we have collected a lot of buildings.  After all, there are so many wonderful buildings now available which make a board so much more worth fighting over.
Buildings not only enhance the attractiveness of the board, they also add another dimension to the game with height considerations, cover, firing positions, additional observation issues and more. The Bolt Action rules for buildings are pretty reasonable but they assume a boring small building with no interior details. However, many of the MDF buildings have lots of interior details like rooms, stairs and interior walls which make a whole new area in which to fight.
In our demo games we almost always have some or many buildings.  After all, how can we resist?
As such we have developed a series of clarifications which allow us to use the buildings and take into account the full details of the inner and outer features.
Click to download the PDF
Our PDF lists all the building rules from the Bolt Action Rulebook and FAQ and our clarifications we use when running demo games.
These have been play tested over a great many games and seem to work out pretty well for us. We figured it would be good to share it with the Bolt Action community as a matter of interest.
These would be classified as "House Rules" and would not be used in tournaments, but for a board with lots of detailed buildings they make a lot of sense and enhance the building based gameplay.

We have also created a video overview of our building collection. Even we were surprised at how many buildings we have!  After all, the collection has grown by a few here and a few there and before you know it we have a busy little town for our men to fight over.

Sunday, 18 January 2015

The Building Personalisation Project

Everyone helps out. But there's a cost. Girls add pretty bits.
As you may have noticed looking over our blog, we have quite a few buildings from a number of different companies.  One issue with this is having our buildings stand out and have more of a personalised nature.  Through various means, we have collected many 4Ground terrace houses and they all look pretty much the same. So, in preparation for Cancon 2015 we have finally sat down, done the work and put our own touch on the buildings.
The paint we have used is all from sample pots purchased from the local paint store. We asked the store clerk for any colours which would match the WWII period.  It is a sort of restoration, we explained.
Now there is daily Mass at our St Michael's church.
The Church needed some long planned customisations.  We built an inner wall with two side doors leading to the rear changing rooms and church office. Then we added a stone floor to the church and lots of different touches such as the stained glass windows and crucifix. My son looked at the bare church and thought, "Why not?" and constructed the altar and sanctuary and then went a little over board and created the altar cloth, candles, host and chalice too. Add in a few religious pictures and of course Saint Michael, patron saint of paratroopers, and the church was finally complete.
Then my wife and daughter got creative and looked in my son's box of many colours and selected lots of bright colours.  These made the doors and window sills very special.
A good place to hide a bazooka team
If you are visiting Cancon next week, pop over and you will see lots of special touches.  There are carpets and rugs in some of the houses, chairs and tables, glass in some windows, edges highlighted, smoke from chimneys and more.  Basically, we wanted to create a town in which people would live so the battle makes a lot more sense.
We did a short video walkthrough of some of the personalisations.
Enjoy.

These citizens have made their homes special.

Lime Green and Blue are perfect colours.

Thursday, 2 October 2014

MOAB Jungle Board

The Brick and Pipe Factory
We have our second MOAB board ready - the Brick and Pipe factory with Observation post in the Jungle.  That is a bit of a long name, so we cleverly call it the "Jungle Board" for short.
Once more we have considered a number of factors in this board.
1. It looks cool (A very important factor)
2. Two objectives
3. Open, closed and interesting lanes of fire and movement.

The Observation Post on the hill

Bamboo thicket with removable bits

Rice Paddies and jungle edges
Consider the following factors:

  1. The Hill - the observation post is on a hill surrounded by some sandbag positions. There is no cover other than the slope of the hill and the sandbags which is actually more cover than it seems.
  2. The Bamboo thickets - Although effective sight blockers, they are rough ground for infantry, no-go for wheeled vehicles but can be driven through by tanks.
  3. The Brick and Pipe factory - Hard cover and buildings and walls.
  4. The Rice Paddies - Rough ground but no cover.
There is also plenty of open ground, but often broken by hard or soft cover.  The test game (next post) was very interesting.
The objectives are the Observation post and the well at the centre of the Brick and Pipe factory.

This should prove to be a most enjoyable board.

Sunday, 1 June 2014

City Heights Project - the battle

View from the outskirts
Today we had a great game with two new players.  They had visited us a few weeks prior and caught sight of the City Heights Project board. "Tell us more!" they asked.
So today we had their first Bolt Action game.
And - as is so often the case - the game ended in a frantic dash where either side could have won.

Allies:

Australians:
1 x Officer(2nd Lt + 2men )
1 x FAO(Free Artillery Observer )
1 x Sniper(2 men Veteran)
1 x MMG(3 men )
3 x Infantry Squad(NCO (SMG),LMG ,8 rifles )
1 x PIAT(2 Men )

View from the heights

Turn One - Dead Cromwell
 British:
1 x Officer(2nd Lt + 2men )
1 x FAO(Free Artillery Observer )
1 x Infantry Squad(NCO (SMG),LMG,8 rifles )
1 x Airborne Squad(NCO (SMG),LMG ,8 rifles Veteran Stubborn)
1 x PIAT(2 Men )
1 x Cromwell(Med AT, Coax MMG, MMG )

The chateau - full of Germans with Aussies out front

Axis:

Germany 1:
1 x Officer(2nd Lt + 2men )
2 x Heer Infantry(NCO (SMG),LMG,8 rifles Veterans)
1 x Waffen SS(NCO (SMG),LMG,8 rifles Veteran Fanatics)

Sniper at the top and MMG at the bottom.  Very effective.
Germany 2:
1 x Officer(2nd Lt + 2men )
1 x Heavy Mortar(Spotter Off Board)
1 x MMG(3 men )
1 x Heer Infantry(NCO (SMG),LMG,8 rifles Regular)
2 x Volks Grenadiers(NCO + 4 (Ass Rifles) + 3 rifles Green special)
1 x Sdkfz 234/2 Puma(Med AT, Coax MMG )

Germans amassing for the final turn.
Each army is 600 points. There were two objectives, one at the base of the ramp and the other at the top of the ramp.  It could only be captured by an infantry unit of 3 or more men.

The game took 2.5 hours which was excellent for a 1200 point game and 4 players. The game went to 7 turns, with ownership of every objective contested for both turns 6 and 7.
The city heights stair proved to be a perfect place for a sniper at the top of the stairs and the Vickers MMG using the cover of the lower stairs. The sniper and the Vickers were very effective in pitting pins and casualties on the veteran Germans facing them.  The combination of multiple Australian units inflicting pins severely hampered the german veterans.

One highlight was the destruction of the British Cromwell in turn 1.  At this point the Australian had a PIAT that he didn't need so transferred it over to his partner's forces. In the end, the British player still managed to capture and hold the objective by the skin of his teeth.

The board was very enjoyable to play on with lots of nooks, crannies and interesting firing angles and cover options.

And the best result?  The game was so much fun that the new players are looking forward to our next game. They invited themselves back.
Perfect!

LinkedWithin

You may also find these posts of interest: